My Edible Garden

Edible Landscaping the Backyard

Sustainable Living

It's not that hard.

Wednesday, November 25, 2009

Baked Honey Mustard Chicken

Honey Mustard ChickenI don’t want to eat fast food everyday. So quick meals are what get me through the work week. And this recipe for chicken breasts is one of my new favorites. It seems the grocery stores here always have boneless skinless chicken breasts on sale, so I always stock up. But at this rate, I just may grow feathers.

Honey Mustard ChickenAnyhow, the flavors combine perfectly in this baked chicken dish. You won’t get too much honey or too much mustard flavor, as the two meld together to create a zingy and moist chicken breast. Serve alongside some wild rice.

Honey Mustard Chicken
Printable Version
Ingredients
  • 2 lbs boneless skinless chicken breasts

  • 1/3 cup honey

  • 1/4 cup Dijon mustard

  • 1 tablespoon lemon juice

  • 3 tablespoons butter

  • 1/8 teaspoon salt

  • 1/4 teaspoon crushed rosemary

Directions
  1. Preheat oven to 350°.

  2. Arrange chicken pieces in a shallow baking dish.

  3. In a saucepan over med-low heat, combine remaining ingredients. Heat and stir until melted and well-blended.

  4. Pour over chicken pieces.

  5. Bake at 350° for about 45-50 minutes (or until internal temperature of about 177-degrees); basting chicken occasionally.

  6. For the last 20 minutes of cooking, sprinkle with some Italian breadcrumbs.

Sunday, November 22, 2009

Oh No! Where’s My Eggo?

Kellogg is rationing its Eggo products due to flooding and equipment problems at two bakeries. The shortfall could last through mid-2010.

Flooding at an Atlanta bakery during heavy rains in October forced Kellogg to shut down production temporarily. Plus, equipment at Kellogg's largest waffle facility, based in Rossville, Tenn., needs extensive repairs.

Apparently remaining inventory will be rationed to stores across the country based on historical percentage of business.

You could always make waffles from scratch or with homemade Bisquick. It’s almost as fast as the toaster, and probably tastes better too.


Friday, November 20, 2009

Brown Sugar Apple Cheesecake

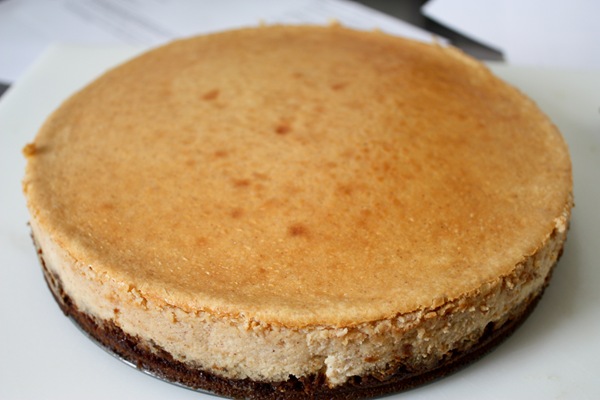
Apple CheesecakeI love cheesecake. But apple cheesecake is not my favorite. With that said, I was up for the challenge to come up with a recipe that worked for me. Let's just say my first venture into the land of apple cheesecake was a complete disaster. I used Granny Smiths and sautéed them much like this recipe calls for. But the apples were still too moist, allowing their juices to mix into the cheesecake batter making for a gloppy mess. This time was different thankfully.

Apple CheesecakeI adapted my base cheesecake recipe with some added brown sugar, apple pie spice (usually a mixture of cinnamon, nutmeg and allspice) an d apple cider. The apple cider gave it a hint of apple flavor but the star of the cheesecake are the apples themselves. A surprise layer of sweet and caramelized apples are hidden inside this cheesecake. They came out tender and didn’t mess with the texture of the cheesecake batter.

Apple CheesecakeI used Fuji apples this time and I was pleasantly surprised. They don’t fall apart in the frying pan, they hold their texture and even caramelize beautifully with a little added brown sugar. These are my new favorite cooking apples.

Apple CheesecakeThe ginger snap crust was great with some added cinnamon and brown sugar. Although the cookies are strong flavored, the crust didn’t overpower all the other flavors.

Apple CheesecakeOverall, this cheesecake is a winner. But now I want to try the recipe with the apples ON TOP of the cheesecake, drizzled with some caramel sauce. That sounds even better.

Printable Version
Filling

4 (8 ounce) packages cream cheese

1 c. brown sugar

½ c. white sugar

¾ c. milk

4 Tbs. apple cider

4 eggs

1 c. sour cream

¼ c. all-purpose flour

1 ½ teaspoons apple pie spice

Apples

4 tablespoons butter, divided

3 large Fuji, peeled, cored and cut thinly, divided

2 tablespoons brown sugar, divided

Crust

1 ½ c. ginger snap cookie crumbs

2 Tbs. brown sugar

4 Tbs. melted butter

½ tsp. cinnamon


Directions

For the Apples

In a large skillet, melt 2 tablespoons butter over medium-high. Stir in half of the apples and cook, until they are golden and limp, about 5 to 10 minutes. Scatter the apples with 1 tablespoon brown sugar and cook, tossing to coat, for 1 minute. Scrape apple mixture onto a plate and repeat with remaining apples, butter and sugar. When done, set aside to cool.

For the Crust

In a medium bowl, stir together cookie crumbs, brown sugar, and cinnamon. Drizzle in butter and stir to moisten the crumbs. Scoop crumbs into a spring form pan coated with nonstick spray and firmly press them over the bottom and up the sides of the pan. Place pan into a preheated oven at 350 degrees and cook for 10 minutes, until the edges are golden. Remove from oven and allow to cool.

For the Filling
  1. Triple wrap bottom of spring form pan with the wide version of Reynolds foil.
  2. In a large bowl or stand mixer, mix cream cheese with sugars until smooth. Blend in milk and apple cider, and then mix in eggs one at a time, mixing just enough to incorporate. Mix in sour cream, apple pie spice and flour until smooth.
  3. Pour about a third of the filling into the prepared crust. Add the apples as an even layer, and pour the rest of the filling on top.
  4. Use a water bath for the cheesecake. Put spring form pan in larger rectangular pan. Set in oven, and add water until about 1-2 inches high on spring form pan.
  5. Bake in preheated oven for 1 hour. Turn the oven off and leave cheesecake to cool, about 2-3 hours, to prevent cracking from cooling down too fast. Then remove from oven and set on counter to finish cooling to room temperature.


Monday, November 16, 2009

Oat-Nut Pancakes

Oat Nut PancakesTired of plain ol’ pancakes? It seems many restaurants have a fascination with thick, heavy pancakes. They’re so thick, they barely get a chance to cook inside, leaving a funny, floury after-taste. They may even go so far as to call them “fluffy.” But as you near the end of your breakfast, you realize you’d rather not see another plate of pancakes any time soon.

There’s really not much to pancakes. It’s basically flour and water or milk. Not exactly the most nutritious by the time it’s drizzled with syrup and butter. But enough preaching. I wanted to try a different take on the regular pancakes. This recipe is said to be a copycat of Ihop’s Harvest Grain & Nut Pancakes. I’ve only eaten at Ihop once so I can’t say if these taste like them or not. But I will say this is a welcome change to Bisquick-style pancakes.

Oat Nut PancakesI ground up the oats and mixed all the ingredients together. Once my pan was hot enough I added the batter and waited for the first side to get done. It seemed to take a little longer for these to cook compared to regular pancakes. My pan was lopsided on the bottom so that may have had something to do with it. But I soon found they do indeed cook differently.

Flipping the pancakes was a more delicate process than I’m used to. I had to wait to flip them until the top batter was almost dry. Once I realized how they cook, the rest of the process was easy.  

Oat Nut PancakesAnd the small amount of extra effort paid off. They turned out pillowy, and I mean that in a good way. The syrup didn’t just run off the top, it soaked into every nook and cranny it could, almost like a sponge. The taste was hearty and wholesome from the wheat flour, the oats and walnuts. While the buttermilk helped give it a slight zing.

As for my crappy frying pan? It’s about to be traded in for a nice griddle. That’s the one thing I’ll be after during all these crazy Black Friday sales.

Printable Version
Ingredients
  • 3/4 cup Quaker Oats
  • 1/2 cup whole wheat flour
  • 1/4 cup all-purpose flour
  • 2 teaspoons baking soda
  • 1 teaspoon baking powder
  • 1/2 teaspoon salt
  • 1 1/2 cups buttermilk
  • 1/4 cup vegetable oil
  • 1 egg
  • 1/4 cup sugar
  • 3 tablespoons chopped walnuts
Directions
  1. Lightly oil a skillet or griddle, and preheat it to medium heat.

  2. Grind the oats in a blender or food processor until fine, like flour.

  3. Combine ground oats, whole wheat flour, baking soda, baking powder and salt in a medium bowl.

  4. In another bowl combine buttermilk, oil, egg and sugar with an electric mixer until smooth.

  5. Combine dry ingredients with wet ingredients, add nuts and mix well with mixer.

  6. Ladle 1/3 cup of the batter onto the hot skillet and cook the pancakes for 2 to 4 minutes per side or until brown.

Saturday, November 14, 2009

The Perfect Roasted Chicken - (in my humble opinion)

I love chicken, mostly because I ate it so much growing up but also because it is so versatile. There are over a million recipes for chicken I'm sure and I'm sure just about as many ways to cook the bird, but the trick is to use the proper technique for each recipe you try. I've roasted countless chicken throughout my time as a cook and I am constantly looking for ways to improve recipes and simplify the process of roasting in general but I have found the classic technique to be the best. This is a dinner I cooked a few nights ago for someone and here's that recipe, try it for yourself and see if it works as well for you!

1 3-4 lb. (approximately) chicken, quartered
1/4 cup flour
1/2 tsp. salt
1/8 tsp. pepper
1/4 tsp. thyme
1/4 tsp. oregano or marjoram
1/4 tsp. rosemary
2 tsp. fresh parsley, minced
3 cloves garlic
1 large onion, chopped
1/2 cup chicken broth

Preheat oven to 375°F.
Wash chicken and cut into quarters.

In a heavy skillet, add olive oil to a depth of 1/4 inch. Add whole cloves garlic and chopped onion.

Measure flour, salt and pepper into a zipper plastic bag. Shake 2 pieces of chicken at a time in the bag until well coated.

Brown the chicken evenly on both sides in the olive oil. There is no need to cook through. Transfer browned chicken and onion slices to a casserole dish or baking pan.

Combine herbs and chicken broth. Baste chicken with broth and a little olive oil, and continue to baste occasionally during the cooking.

Roast chicken for 50 minutes or until tender and juices run clear (depends upon weight of chicken). Breast temperature should be about 160°F.

Friday, November 13, 2009

Magic Cookie Bars

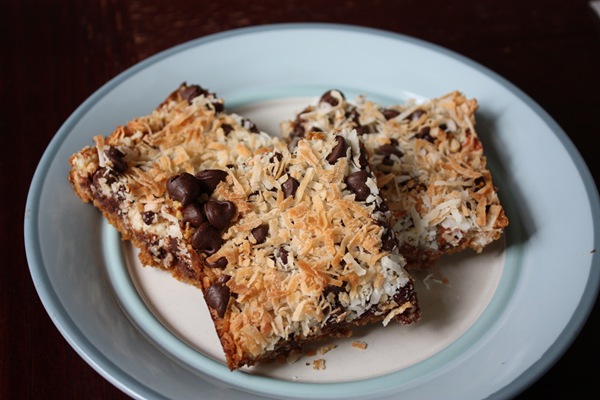
Magic Cookie BarsLayers of chocolate, coconut and nuts with sweetened condensed milk and graham cracker crumbs. Sounds good doesn’t it?

This is one those easy favorites anyone can make. There’s recipes all over the net and you can even buy a kit from the grocery store by Eagle Brand (they’re the ones who make sweetened condensed milk.) I definitely had graham cracker crumbs left over from my fanatical cheesecake baking a few months ago. But I was out of sweetened condensed milk. Yet strangely, I had all the ingredients to make homemade sweetened condensed milk, so that’s what I used.

I just added the graham cracker crumbs with the butter and pressed them down to form a good, solid crust. And then I just layered the sweetened condensed milk, the chocolate chips, coconut and nuts on top, and that was it.

The coconut gained even more flavor from baking and they turned into a great crunchy topping. You’ll definitely need a plate because the coconut does fall off fairly easily.

Magic Cookie BarsMake sure you have a house full of kids or some company so they can disappear quickly. Maybe it’s just my sweet tooth but I have a tendency to eat all the treats I make by myself. As a kid I could easily eat 3 to 4 candy bars a day. By 18, I was out on my own and rarely ate a candy bar. Nowadays I’ve moved from the candy bar to fattening treats. What could go wrong?

Magic Cookie BarsMagic Cookie Bars
Printable Version
Ingredients
  • 1/2 cup butter, melted
  • 1 1/2 cups graham cracker crumbs
  • 1 (14 ounce) can Sweetened Condensed Milk
  • 2 cups semisweet chocolate morsels
  • 1 1/3 cups flaked coconut
  • 1 cup chopped nuts (I used almonds because they were on hand.)
Directions
  1. Heat oven to 350 degrees F (325 degrees for glass dish). Coat 13x9-inch baking pan with no-stick cooking spray.
  2. Combine graham cracker crumbs and butter. Press into bottom of prepared pan. Pour sweetened condensed milk evenly over crumb mixture. Layer evenly with chocolate chips, coconut and nuts. Press down firmly with a fork.
  3. Bake 25 minutes or until lightly browned. Cool. Cut into bars or diamonds. Store covered at room temperature.
Variations

Substitute 1 cup (6-ounces) butterscotch flavored chips* for 1 cup semi-sweet chocolate chips and proceed as directed above.

From Eagle Brand 

Thursday, November 12, 2009

Yes You Can! (A White House Victory Garden)


So as I always do I ran across this story about first lady Michelle Obama and her message to the nation about eating healthier and being conscious about why we are eating what we are eating and I thought I'd share it with you!

Rarely has a giant sweet potato, a muddy knee and a stubbornly rooted fennel plant caused such a stir. But when First Lady Michelle Obama led groups of District of Columbia fifth-graders Thursday afternoon in the fall harvesting of the White House Kitchen Garden, much oohing, giggling, cuteness and shutter-clicking ensued.

The students, White House kitchen staff and representatives from Miriam's Kitchen — which feeds the homeless and was the main beneficiary of the vegetable haul — gathered on the South Lawn around picnic tables draped in red-and-white checked tablecloths and topped with baskets of apples.

White House assistant chef Sam Kass divided the kids into groups of three. A trio of girls from Bancroft Elementary School were paired with the first lady, who initiated a contest to see which kids could dig up the largest sweet potato. Obama noted that she and her daughters already had harvested a particularly hefty one. "They're huge," she said, underscoring the size of the potatoes by holding her hands about 12 inches apart. "They're huge!"

The first lady — dressed in jeans, a purple cardigan and purple sneakers — and her team of students — dressed in yellow Bancroft T-shirts — produced a basket filled with impressive tubers, which she presented to the assembled photographers and reporters for documentation.

Obama noted that already 740 pounds of food have been harvested from the garden,
which cost less than $200 to plant.

For fall, in addition to the sweet potatoes, the children gathered wheelbarrows full of carrots, lettuce and enormous fennel plants, one of which required the full weight of the first lady and her team members to extract from the ground. "You're going to eat your vegetables, right?" Obama said in the way in which parents turn a question into a decree.

After all their hard work and before settling in for an afternoon snack of apples and cider, the young farmers gathered for a group photograph, proudly posing with their vegetables, the first lady and her one very muddy knee.

By Robin Givhan
The Washington Post